How to Bore Sight a Rifle
-
2
 Comments
- Last updated: 23/03/2020


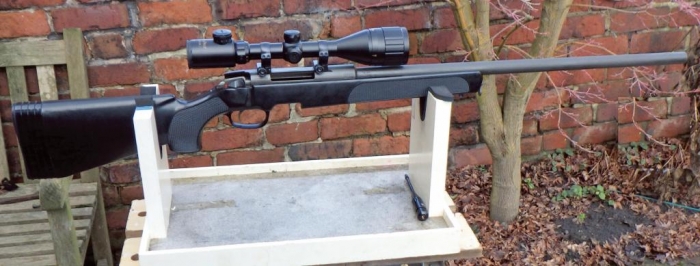
Having purchased and fitted a new scope the all-important process of sighting in can begin and, if you follow a few simple rules, you can get this done without burning your way through a ton of ammo. The principal of sighting in is very simple; you are aligning the line of sight through the scope with the bore of the gun so that, all things being equal, the bullets arrive at the point of impact indicated by the cross hairs of the scope.
When you mount the scope onto the gun the mounts will usually have four screws on each ring, which are tightened sufficiently to grip the body tube of the scope without damaging it. This is best done by gradually tightening the screws on each ring in a diagonally opposite sequence, starting with screw 1, then 3, 4 and finally 2. This ensures that the scope body is not pushed to one side or the other as the rings are tightened. If you have a suitable torque wrench you can make sure the screws are tightened to the correct degree, (this is often stated in the instructions that come with the scope). Once mounted the scope should sit in line with the barrel with no obvious deviation from the general parallel line. Some scope mounts have a front and a rear mount so be sure to check you have used them the right way around, otherwise the scope will point up or down significantly deviating from the line of the barrel.
It is important to resist the temptation to start trying to sight the gun in immediately by firing it and trying to see where the bullets are going. Although most scopes are sold pre-centred it is still possible for them to be way-off when first mounted, so you need to get the sight and the barrel converging within a safe zone before you start unleashing the lead!
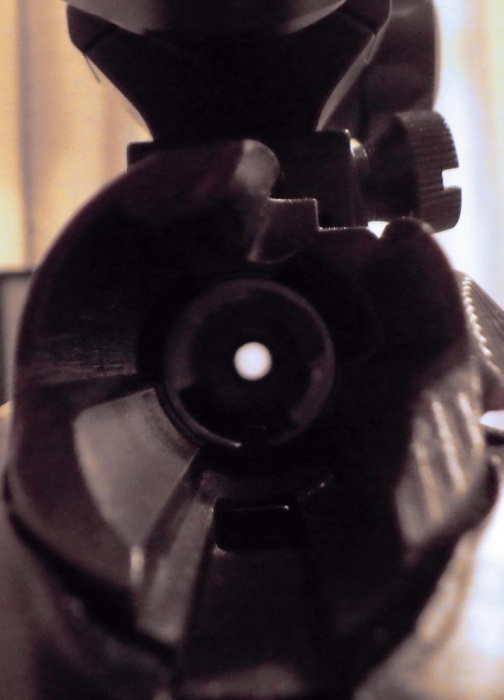
This method is most commonly used on bolt-action guns where the bolt can be completely removed so you can see all the way through the barrel unobstructed. With other types of guns it can be more difficult and involves some degree of disassembly. With the gun securely held in a gun-vice or propped on something stable, and a clear line of sight to an easily recognisable object around 50-metres away, remove the bolt from the rifle and look through the barrel. For initial alignment I have found a single standing tree, with a large side branch, against a clear background to be a useful target object. Position the gun carefully so that the point on the trunk where the side branch comes off it can be clearly seen through the bore of your gun, this is best achieved by holding your eye about a foot back from the chamber of the gun but try different distances to find what suits your own eyes best. Getting the trunk/branch junction right in the middle of the bore is desirable. With the gun held securely in that position you can them move your eye to the scope itself and hopefully the tree trunk will be visible somewhere in the field of view through the eyepiece. Using the turrets of the scope adjust the scope until the vertical crosshair lines up with the centre of the trunk. Windage-wise you are now close to on-target.
Now looking at the horizontal side-branch, adjust the vertical position of where the cross hairs meet so that it sits on that feature. During this process keep checking through the barrel to ensure the view through the bore and the view through the scope are the same. This should bring elevation adjustment in line with the bore.
If this process does not get the target object into the centre of the scope, and you run out of adjustment on the scope, then there is probably something wrong with the way the scope is mounted onto the gun. Check that the mounts are correctly installed in accordance with the instructions.
This process will not fully sight in your gun, and often you might have to repeat it at different distances until you are happy that the scope and the bore are aligned reasonably well. The object is to ‘get you on the paper’ and you will need to finish the job by shooting your particular ammunition and adjusting to the point of impact with the scope turrets. You will hopefully not need to use too much ammunition because you are ‘fine tuning’ rather than sighting in from scratch.
The bore-sighting process described above can be time consuming and difficult but, as with so many things in life, modern technology has stepped in to make things quicker and easier.
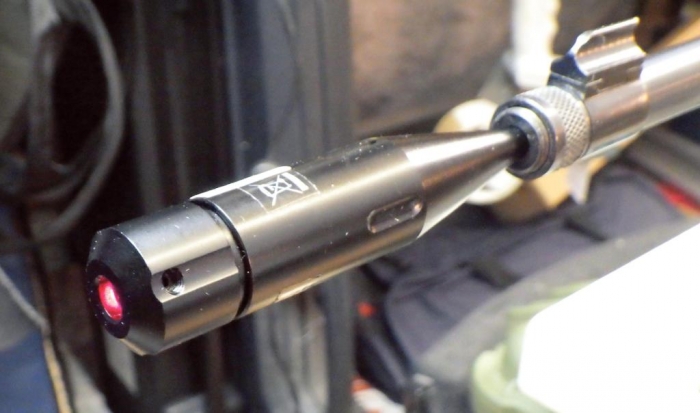
A laser boresighter is a small high powdered unit that will either fit into the chamber of the gun or fit into the muzzle. Once installed it will generate a laser dot, usually red, on the target and that dot is pretty much spot on with the line of the barrel. If it is not too bright-a-day then you will be able to see the dot with your naked eye on the target.
The Bushnell muzzlemounted laser boresighter is a very high-quality item, well-built and easy to use, and it is the authors preferred type of laser. It comes with a set of arbors to suit a wide range of calibres and these are attached to the rear end of the unit to centre it in the bore correctly. Switching the laser on you get a very bright and clear red dot on the target which is very easy to centre the scope on to. The Bushnell boresighter supplied by Fieldsports Malta is a heavierduty and more substantial model than the older version the author has previously used and is well worth investing in.
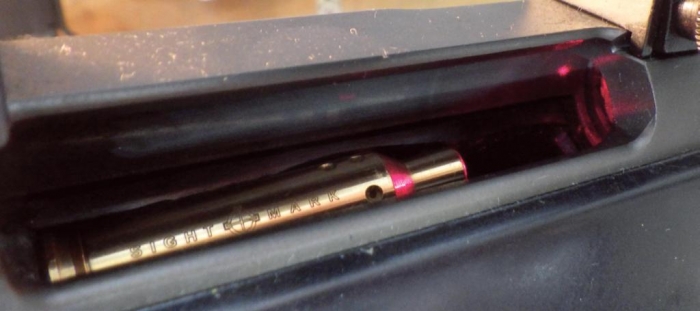
The Sightmark laser boresighter is available in calibre-specific models and it resembles a brass case. It is switched on when the batteries are installed and then inserted into the chamber like a round of ammunition. The red dot is also nice and bright and easy to pick up in the scope. During testing, each time the unit was loaded into the chamber the red dot appeared in a different location around the middle of the field of view, always the same distance from the centre, so it proved necessary to repeatedly remove and replace it to get an ‘average’ indication of centre.
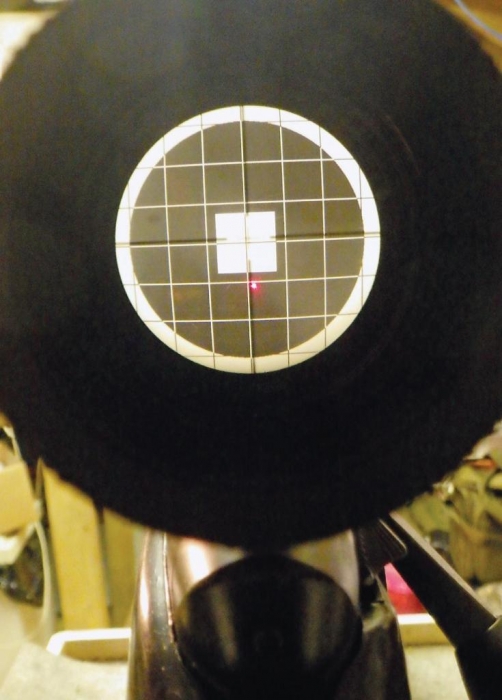
With the scope mounted on the rifle, and the laser boresighter turned on, all you have to do is find the laser dot in the field of view of the scope and move it to align with the centre of the cross hairs using the turrets on the scope. It really is that easy. Using one of these devices it is possible to get your scope almost completely sighted in, requiring even less ammunition to finish the job. It is very important to remember to remove a muzzlemounted bore sight from the gun before you start firing. If you leave it in and fire a live round you are going to do the gun, the laser and potentially yourself a lot of damage!
Having bore-sighted your set up, you will then have to finish the sighting in process. With the gun securely supported on a suitable rest you can fire small groups of shots, maybe three rounds at a time, spot where they are striking the target, and adjust the scope to bring the centre of the cross hairs onto the point of impact. With the laser boresighter you are likely to already be on the target and so will only need to fine tune the sight. If you have boresighted by eye then you may well still be much further from the centre of the bull, hopefully on the paper, but it might need to be a big bit of paper!
Bore sighting by eye is a very effective way of getting your rifle scope set up and once you get the knack of doing it and ‘get your eye in’ it becomes pretty easy. Using a laser does speed up the process and get you closer to the target, with the resulting saving on the amount of ammunition you need to finish off sighting-in often paying for the initial cost of the laser itself. Whichever method you use it is important to ensure that before you start firing the gun you are confident that your sight and the barrel of the gun are reasonably closely aligned so as to prevent bullets leaving the safety zone on the range.
Many thanks to Fieldsports Malta: fieldsportsmalta.com, for supplying the Bushnell laser boresighter and Sellmark: sightmark.com for the loan of the Sightmark boresighter.
click on image to enlarge
click on image to enlarge
click on image to enlarge
click on image to enlarge
click on image to enlarge